Showing posts with label new sewing room. Show all posts

Monday, July 11, 2016

MAKING MINOR REPAIRS...


This is the wallpaper in my new sewing room.  How it got like this, I have absolutely NO idea as that seam was behind a console table...so not in an area where we could have brushed against it.


Last weekend Dear Hubby and I stopped at the local hardware store to pick up a few necessities...including seam adhesive.


This area of the seam was in really bad shape and I hoped that I, and the adhesive, were up to the job.


The salesman at the hardware store told me I needed to "soften up" the wallpaper with water or it would be too brittle to work with and would crumble.  Oh, I did NOT want that!  This wallpaper has to last for many more years, as there are too many other necessities that MUST be fixed before Dear Hubby retires and our income drops.  So I used a new clean sponge and a bowl of water to moisten the paper.  Sorry, I forgot to take a picture.  Beginning at the top of the seam I squirted some adhesive behind the paper, being sure to press the nozzle deep behind the paper where the pulling away had started.  After wiping away the overflow with a damp paper towel I pressed the seam down and added a tiny piece of painter's tape to keep the seam together while it dried.


The majority of the seam went really well, until I got to the big rip.  I was a little too ambitious in pressing it all together and I ripped it even further.  Grrrr.  So I carefully pressed everything back where it belonged and moved on to the next section.  I did not apply tape as I was afraid that even a non-stick product like painter's tape would make things worse.


After about 15 minutes I carefully peeled off the tape.  Voila, the seam looks SO much better now!  If you look almost dead center you will see the area that is still slightly discolored as the glue is still wet.  To the left of the seam is where the big piece ripped.  I'm sure it will blend in much more thoroughly when the "extra" amount of necessary adhesive dries.  Is it perfect like when the wallpaper was first hung 26 years ago?  Nope.  But the adhesive should allow for many more years of use, and with the busy print it is hardly noticeable. 

Maybe someday I will be able to have the walls painted and the carpet replaced with laminate.  But for right now I adore my sewing room.  I grew up in a household where everything was "fixed", sometimes numerous times, before it was eventually replaced.  I'm proud to say that my parents' teachings have taken hold and I'm actually excited about embracing the three, make that FOUR, R's of frugality...Reduce, Reuse, Recycle and REPAIR! 

Toodles...

Monday, May 16, 2016

MY SEWING ROOM IS FINISHED...


This is the entrance to my Scrappy Happy, Therapy Place!  Since I hung that mini quilt, my Dear Hubby has been referring to my sewing room as my Therapy Room.  Considering that my sewing/quilting is the only thing that keeps me sane some days, he isn't far off of the mark!  It took quite a while, but I was finally able to get my doors painted.  I worked literally one full day from early morning until dinner time to finish the painting.  However, breaking the job up into 8 separate sections allowed me to spread the work out over multiple hours, including breaks, without a "dry edge" showing.  There was one problem, but I am going to "let it go" until the time when we repaint the foyer.

The lighting in my room is HORRIBLE.  On a sunny day the light is a wee bit better, but still not good.  Unfortunately, our area has had practically NO sun for what seems like FOREVER!  So I have been painting in very poor lighting.  When I finally saw the paint in good light, I realized that it was "duller" than the rest of my doors.  A quick check of the can revealed "semi-gloss" as opposed to the "glossy" paint I have used everywhere else in my home.  I was all ready to blame myself for ordering the wrong paint.   When I mentioned to Dear Hubby that I had messed up on the paint order he begged to differ.  "No you didn't mess up.  I was standing right next to you.  You ordered GLOSSY!"  I feel a little better knowing it wasn't MY fault that I'm unhappy with the paint job, and since I have made the conscious decision not to sweat the small stuff...I'm perfectly okay with leaving the doors as they are.  The doors are protected with paint and they will service my sewing room just fine for the time being.


Immediately to the left of the door is my plastic drawer unit and the bench where visitors can sit.  I apologize for such a horrible picture but, try as I might, I could not get a better photo.  This drawer unit holds all sorts of "craft" items...beads, glue gun and glue, paint brushes, etc.; along with my current cotton scraps, denim scraps that will never fit in my designated denim trunk (I really need to make another denim quilt) and miscellaneous white, cream and black fabrics.


Inside the bench, to the left, is where I store all of the information pertaining to machine embroidery patterns.  The patterns are sorted according to type...Sayings, Seasons/Holidays, Inanimate, Living, Food, Unsorted/Miscellaeneous/Techniques.  Beneath these folders is a blue box that holds small pieces of stabilizer.  The right cubbie holds my embroidery module, hoops and a zippered pouch to contain all of the "small" necessities:  embroidery needles, bobbin thread, the embroidery bobbin holder, etc.


My 'Perky Petal Pillow" was a project made about a year ago.


After J built the bench, I used scraps from the pillow to make the bench cover.


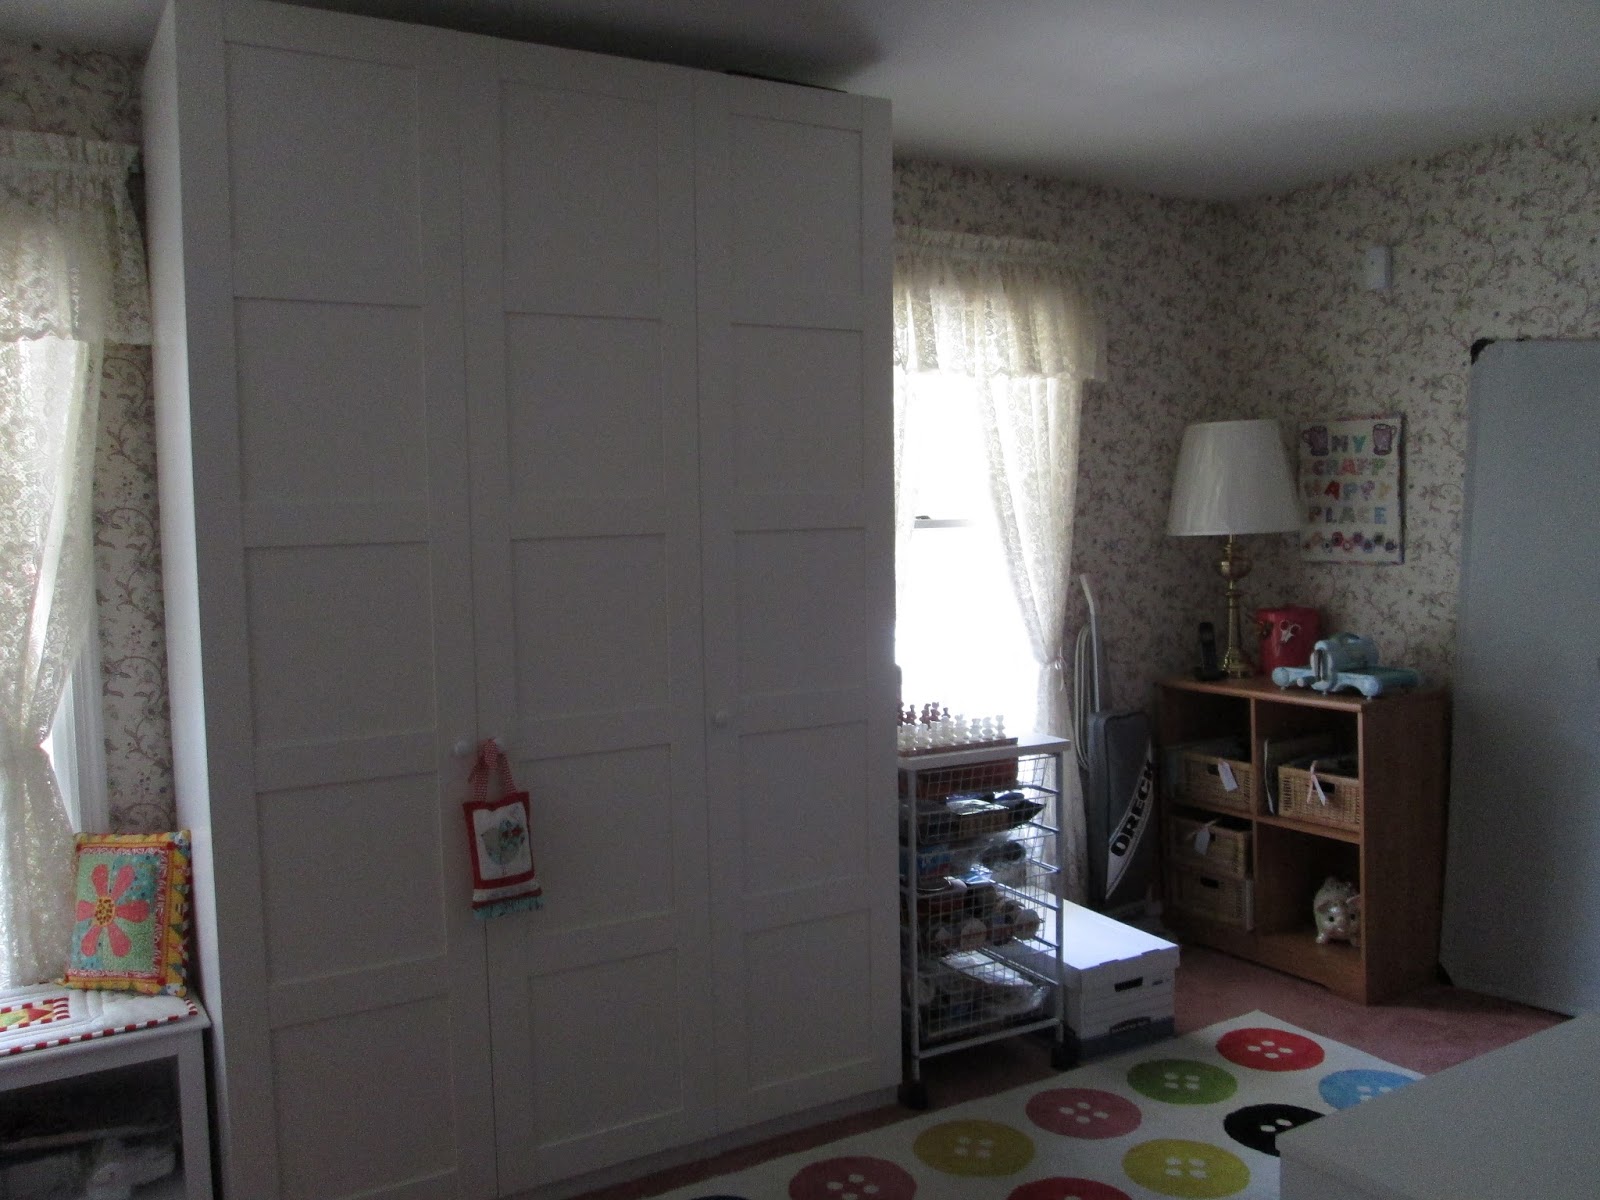
Next along the front wall of my home is my massive Ikea PAX storage unit.  (Peek Inside!)  My old sewing room, though small, did have a large closet.  This being the old living room...no closet at all.  I am in LOVE with this PAX unit.  Inside I store all of my precuts, UFOs, clothing patterns, sorted scraps, larger cuts of fabric, cotton yarn, sock yarn and crocheting supplies.  I have a large box of assorted acrylic yarn under my cutting table.


On top of this metal rolling cart is my pink and white onyx chess set from Mexico.  I carried this bugger, along with a matching backgammon set, onyx bookends, onyx ashtray and 8 pieces of onyx fruit home from Mexico as a "carry on"...on my lap.  By the time our plane landed in Philadelphia I had extremely sore arm muscles and totally numb thighs!  Some 30+ years later it is still one of my favorite possessions.  The pretty pink and green trunk behind it holds all of my embroidery thtread.

Inside of the top drawer is a Tupperware craft container purchased back in the 1970s.  It holds all of my "sewing" supplies...thimbles, chalk, beeswax, pins, etc.  The second drawer holds miscellaneous design scissors, a craft knife set, and even a small automotive tool set, complete with a seat belt cutter and window punch.  I really need to get that out into my glove box as it isn't at all useful in here!  The next drawer down holds all of my ribbons and trims; while the bottom drawer holds pellon products, freezer paper, zip lock storage bags, etc.

Next to the rolling cart is a box that holds items I am selling on ebay and my vacuum cleaner...a necessity in ANY sewing room.


On the back wall of my room are my Sizzix cutting station, my design board and my cutting table.


The top of this cubbie holds my Sizzix machine and a pink bucket for scraps/trash, complete with a small pair of scissors to cut the occasional incomplete die cut.  The extension for our land line also sits on top as it is the ONLY oulet in the room that has not been occupied!


Three of the cubbies hold my Sizzix dies; while the fourth holds a porcelain piggy bank given to me when I was an infant.  Another sentimental piece.


The verdict is still out on this portable design wall.  While I am sure it will be WONDERFUL for use while on vacation, the bars that provide the standing structure are way too large for the design board to sit close to the wall.  I took off the standing bar, along with the vertical bar in order to move the design board closer to the wall.  Because there is no vertical bar holding the top and bottom parallel, the top is bowing.  I must say, however, I don't know how I EVER existed without a large design board! Maybe some day I will have J make me a permanent design board attached to the wall.  Maybe...


In the center of the room, sitting directly in front of my sewing table are two bookshelves that I purchased from Big Lots.  I desperately needed more storage in the room and was looking for something that would provide a bit more support when quilting large items.  Nothing is worse than a quilt pulling downward while you are trying to FMQ!  I, personally, built these bookcases and they were easy as can be (pat-patting myself on the back).  The top narrow shelves hold my scale for mailing out eBay items, my old chess set for playing chess with my 4.5 yo grandson (his favorite place to play is on the button rug) and a large box from chocolate Christmas candy which holds all of my larger pieces of embroidery stabilizer.  The far left middle shelf container holds packing tape, while the other three middle shelf containers hold my essential oils.  The bottom row of containers are empty, but eventually will hold scrap fabric cut to 2.5" squares, 5" squares, 2.5" strips and 5" strips...I think.  I will see which precut sizes I use most often before I finalize the contents.


This is the area to the left of my sewing table.  The peanut butter jars contain pony tail holders, rubber bands, miscellaneous safety pins, 505 spray, tape measure and dressmakers tape, Best Press, sewing scissors and pinking shears.  My FMQ gloves and super glide are also stored here.


On the right side of my machine is a six sectioned container to hold my frequently used items.  The little purple tin is my thread catcher.  The shot glass holds my pins.  I very rarely use a pin cushion as I find just dropping the pins into the magnetized shot glass to be much easier.  As you can see there are numerous lights to try to improve upon the lighting situation in this room.  They don't really work and I believe the only solution will be lights in the ceiling.  That will take some saving up to afford!


On the end of my sewing table I store the bench that came with the table, a turqoise container full of books I intend to read some day, an orchid afghan in case my legs get chilly and my own personal tool kit.


I use an Ikea table for my cutting/ironing table.  Unfortunately, now that it is placed in a corner, I have lost the use of 3 of the drawers in the table.  But it was a small price to pay for moving to a much bigger room.  Next to the drawers are an Ikea Helmer set of drawers.  They are used to store all of my threads.  On top of the table I keep my small pressing board and iron, my current project fabrics (behind the iron), a bin full of mending, a metal bin full of glues/adhesives, a zippered pouch full of empty bobbins, pink boxes full of bias tape, ric rack, etc.  the blue CD holder contains all of my small templates while the white letter organizer holds my rulers.  There is a small ceramic "bag" for pens and pencils and a small pink tray for presser feet.  Below I store my cutting ruler and my tiny iron.


The plastic bin on the floor holds outgrown clothing to make my grandson a quilt.  I think eventually I may purchase an Ikea Raskog cart to hold works in progress.  The big piece of furniture has a file cabinet drawer for sorting PDF patterns and two more drawers for more supplies.  GEEZ we quilters use a LOT of stuff!  My collection of quilting/crafting/sewing books is at maximum capacity!  The cubbies that sit on top hold all of my buttons, a vase of artificial flowers bought for me by J when he was a little child.  He took his money into the Dollar Store and picked out the vase and flowers and paid for them himself.  I will treasure it always.  Next to it is the only toy still remaining from my childhood...a Kozmic Kiddle!


I painted this little table YEARS ago.  It is perfect to hold my tea for one pot and cup along with a selection of teas.  Below it is the cash box I use whenever I have a garage sale.


Next up is my desk area.  I will admit...it is MESSY!  The bookcase stereo belongs to J and will eventually be moving off of my desk.  When my computer died a month or so ago, J bought speakers for my new computer so I no longer need his stereo.  See that pile of folders in front of my monitor?  They are the items that I am still working on daily!  Between our two floods, residing the house, taking care of my parents' medical issues, my medical issues and Dear Hubby's medical issues...I've got enough paperwork to choke a horse!  And, like the proverbial plumber with a leaky sink, as someone who worked with papers every day for the 30+ years I worked....I procrastinate horribly!!!

So that is it for my new sewing space.  Dear Hubby has been trying to talk me into moving to the living room for the past three years and I refused to.  I will say it here for all to see...I. WAS. WRONG!  I love this room more than I could have possibly expected.  Being on the first floor has made my life physically much easier.  And with two windows looking out onto my front porch and landscaping I feel like I am almost sitting outside!  It is, in a word, heavenly! 

Monday, April 18, 2016

COME IN AND SIT A SPELL...


My bench pad is finally finished!!!  I am so in love with it.  It still needs a good pressing and I'm waiting for an Office Depot order that includes 3M Command Strips to attach it to the bench so it stays firmly in place.


I used the leftover fabric from the pillow in the above photo to make the geese.  The red stripe fabric is the backing on the pillow. 


The backing is a prequilted fabric that I received for free.  I added an additional piece of polyester batting to make it a little more "cushy" for the "tushy"!  

This is my favorite kind of project...completely made up of scraps and freebies!  Hmmmm...what to make next?

Toodles...

Wednesday, April 13, 2016

STORING ODDLY SHAPED ITEMS...


Shortly after moving into my new sewing room I discovered two things that were missing...and sorely needed...seating and storage for oddly shaped items!  I had an opening directly in front of my window but did NOT want to cover the window completely.  I wanted egress to the window in case of emergency, and I also did not want to block any of the glorious light from entering my room.  It can get DARK in here...even in the daytime! 

Dear Hubby suggested a bench of some type.  Immediately I realized that a bench could help me store my most problematic item...the embroidery module for my sewing machine!  At my "training" session after purchasing my machine, we students were warned that the embroidery module was a sensitive piece of equipment and grabbing it by any of its "sticky out parts" or storing it in a not level position could prove hazardous to its function.  I tried, unsuccessfully, to store it in my Ikea Pax unit.  DARN that thing takes up a LOT of room!  And because it is recommended that owners NOT store heavy items on top of it, this one piece of equipment would render an entire shelf useless for storing anything else.  Without a closet like I had in the bedroom used for my old sewing room...storage is at a premium!

I took a quick measurement of the general height, width and depth I had available in front of the window, and the measurement of my embroidery module to see if I could find a bench with adequate size and storage.


I found this bench on the Houzz.com website.  However, the site neglected to include the inside measurements of the two cubbies...a critical measurement if I was to store my module.  Using the name of the manufacturer and name of the bench I was able to find it for sale at HomeDepot online..for $5 less than Houzz.com!  Fortunately HomeDepot gave all of the measurements and it looked like my module would juuuust fit!  My fingers flew over the keys to order it.

Unfortunately it took a while to arrive because it was shipped in from out of the country.  But the assembly didn't appear too difficult (at least my son didn't seem ready to pull his hair out during the assembly process) and it is really sturdy and pretty.  Best yet, it gives me a place to store my module, with the lightweight hoops and a zippered pouch of accessories on top.  In the other cubbie I have used six multipocket folders to hold all of my machine embroidery pattern color sheets.  The top one holds the stack of patterns I have yet to sort, patterns with no clear category, and PDF printouts of machine embroidery techniques and tips.

Next to the bench is a large box filled with different types of stabilizers.  The box came from a HUGE box of Russell Stover chocolates that J bought a few Christmases ago.  One of these days I will cover the lid with pretty fabric!

I am currently using the scraps left over from making my Pretty Petal Pillow to sew up a lightweight pad for the top.  I want to protect this beauty from blue jean rivet and zipper scratches!  I hope to have the pad finished soon!  More to come...

Toodles...

Friday, April 1, 2016

WELCOME TA-DAH...


Please excuse the unpainted doors and covered windows...but my welcome sign is DONE.  I am SO HAPPY!


Here is a close up.  Now I REALLY need to finish my doors and put away the last minute things that are STILL lying all around my sewing room!  This sign is definitely giving me inspiration to finish it all so that I can take you on a proper tour!  Soon...I hope...

Toodles...

Thursday, March 31, 2016

WELCOME QUILT...


The french doors have been installed at the entrance to my new sewing room.  They have been primed by the supplier, but still need a coat or two of glossy white.  This weekend I will pick up a quart of paint and spend a few minutes each day working on "finish" painting.  

Many moons ago I purchased this black and white panel.  After retirement, quilting truly did become my therapy!  Following years of working 12 hour days, I needed something to save my sanity and quilting was the solution.  This piece would make a great "welcome" quilt at the entrance to my sewing room!

I decided to use Prismacolor pencils to fill in portions of the fabric.  I didn't want to color in the entire piece as I felt it would be "too" colorful and busy!  Sometimes less is more.  After I had added just the right amount of color I placed the design face down on top of a paper towel covering my ironing board.  I pressed it with dry heat from the back to "heat set" the colors.  Now how to connect the saying strip to the main body of the picture?

Several years back I had designed a fabric at Spoonflower.  It was a series of colored pencils lined up and then photographed as a closeup.  All of those pencils would be wonderfully bright and colorful as a dividing strip...and the fact that the design had been colored with pencils?...PERFECT!  I found the sample and cut 1" strips, which I then sewed end to end making a strip of fabric long enough to fill the gap between the picture and saying below.  I'm lovin' it!

While moving my sewing room I found a piece of prequilted fabric.  I almost included it in my  Freecycle giveaways, but something stopped me.  Now I know why I hesitated!  This super thin batting and backing all in one was just what I needed!  Once I have finished a small amount of quilting, I will decide if the piece will be bound into a mini quilt to hang on my door, or placed into a frame to hang above the entry.  Either way it is the perfect WELCOME to my room.  

I sure do look happy sewing away, don't I?

Toodles...  

Tuesday, March 8, 2016

SEWING ROOM STORAGE...


The main storage unit in my sewing room is finally finished...well almost ;).  This past weekend J and his dear girlfriend built the third cabinet.  I spent Sunday night and Monday filling the final section.  I love the look of this unit...so clean and "cottage" looking.  I hung one of my favorite handmade decorations on the door, a prize I won on Elefantz.com a year or so ago.  The little birdie applique and hand stitchery is just SO cute!


This is the inside of the first and second unit.  It is considered "done", except that I may buy a few more clear shoe boxes to wrangle the items on the center shelf on the right.  Also, the top section on the left could use another shelf so that the slightly larger box "sits" properly.  Since both of these are "cosmetic" items I may not spend the money.  But the perfectionist in me would sure like to see it done, LOL.


This is the right hand unit that was just built this weekend.  I need to ask J to move the shelf all the way up so that I can continue to stack the boxes for easy access.  The shelf brackets are actually screwed in place...and even with a step stool it would be hard for me to manage.  I really don't want to fall off of the step stool and break something when I am just getting my sewing room back together enough to be able to sew! 

The rolling cart next to the cabinet has served many purposes in our home over the years.  It was originally purchased as an extra work surface in our kitchen.  In my old sewing room it was where I stood to use my Sizzix.  However, whenever my Dear Hubby looks at it...all he sees is a kitchen cart, and he thinks it looks "off" in a sewing room.  I told him that at some point I will try to find another home for the stuff in the cart.  But not now.  Eventually I may do away with it, but until I come up with another storage unit it will stay!  I have an idea what storage units I still want to purchase to house all of the items still in my old sewing room closet, but I will work with the current layout to make sure my ideas on paper will work in reality. 

So far I'm lovin it!

Toodles...


Sunday, January 31, 2016

MY NEW SEWING ROOM...GETTING STARTED...


If you have been reading along for a number of years you may remember my first sewing room.  After shutting down my business in 2010, we converted my former office into a wonderful sewing room.  I was in heaven!  However, it wasn't long before I began to outgrow this room, the smallest bedroom in our home.


When our Dear Son moved out of the house, I took over his old bedroom...had it repainted and appropriated his wonderful Ikea PAX unit for storage.

For several years now my Dear Hubby and Dear Son have suggested that I empty out our formal living room (which was NEVER really used in the 26 years we have lived in this house) and make it a larger sewing room.  I hemmed, I hawed and just couldn't bring myself to get rid of my pretty furniture...but more importantly, my organ.  I haven't been able to play it in at least 5 years, but it was such a big part of my life that removing it from our home seemed impossible.  Until recently.  I guess I have become wiser in my 55th year.  Life is meant to be lived and ENJOYED...and the formal living room was not offering me the opportunity for either!  And keeping my organ only brought home the fact that I would never again be able to play the way I once played!


So, after swallowing hard and breathing deeply I made the decision to take the plunge.  I would move my sewing room into the living room area.  Before Christmas I began organizing items to list on eBay.  By January 4th I had sold my organ and the large majority of furniture.  Yesterday, all but a sofa table and end table were picked up by the new owners.  I had every intention of putting down new flooring prior to moving into this room...but the expense of our flooded basement, a temperamental 14+ year old refrigerator, a broken freezer and three more appliances also purchased in 2001 gave me pause.  I have the distinct feeling that I am going to be hemorrhaging money this year.  New flooring is an expense I can do without! 

 
So today my incredible son and his wonderful girlfriend began moving furniture.  For HOURS they disassembled my sewing room and hefted the main pieces of furniture down the stairs.  My desk and printer sit in the place once occupied by my organ. 


My sewing table and cutting table sit across from my desk.  I still have a few smaller "furniture" items that need to be moved down next weekend...along with my son's Ikea PAX unit.  I think I will hide in my bedroom and chew my nails while they are moving that monster, LOL. 

And my old sewing room right now??? 


ACK!!!!!  Everything on, or in, my desk and sewing table was removed to lighten the load for carrying.  What is left is a mish-mash of stuff piled anywhere it could fit without causing an avalanche!  Oh, excuse the blurriness...my tremor is in its glory! 

Starting tomorrow I will move things downstairs, one handful at a time.  It may take me a full week to carry the bits and pieces downstairs, but I will do so happily knowing that I am working toward a beautiful new sewing studio. 

More to come!

Toodles...

Thursday, December 31, 2015

Prepping For The Move...


Now that Christmas is over I can begin preparing to move my sewing room down to the living room!  I can not WAIT to have a room this big to create in and, most importantly, with it located on the main floor of the house I can seriously reduce running up and down the stairs. 

So, yesterday I listed my sofa, 2 wing chairs, 3 tables, 3 lamps, mirror, a decorative hourglass and my Lowrey organ on eBay.   Within 30 minutes I had bids on the chairs, 2 tables, 2 lamps, the mirror and the hourglass.  Even with the bid, I still see people saving the items to their "watch list".  Maybe that means I will get more than my starting bid amount as it gets closer to the end of the auction.  But, since my goal is to empty out the room as quickly as possible...I priced these things to sell! 

I have had 32 people view my Lowrey listing and one person has placed it on their watch list.  Back in 1974 when my parents bought me the organ, it cost $8000.00...an astronomical price!  But I had a gift and they were determined to do everything they could to help me reach my potential.  For the past 10 years or so it is impossible to buy replacement parts, so even if someone just purchased it to cannibalize it for parts...$25.00 is a steal! I think I may be quite emotional when "my baby" leaves this house, but I haven't been able to play it in years...so making room for a hobby that I still CAN do makes a whole lot more sense. 

Tomorrow J and his girlfriend will begin moving things around so that at least a few items can be brought down from my sewing room.  We know it is going to take several days of lifting and moving furniture...but it will be a start! 

This morning I have purged through my sewing catalog drawer and have purged through one bin of fabric.  There is a LOT more to do, but slow and steady will have to be my pace.