Monday, April 29, 2013

I'M DOING SOMETHING WRONG.......

Yesterday, Lucy, at Attic24 posted an ADORABLE crocheted neck warmer.  Oh, how I love it.  I just HAD to make it.  I know, I know, we are just getting OUT of neck warmer weather...but I figured if I started it NOW, MAYBE I would have it finished by next Fall, lol. 

So I went to my box of "unknown" yarn that I got free on Freecycle and picked out a variety of color partial skeins.  Not all of them are my favorites, but the variety is nice. 


Figuring that I probably had a head and neck about the size of Lucy, I used her 93 chains as my beginning point.  Within NO time I was just whizzing along.  But, round about row six I noticed that my completed piece...instead of lying nice and straight like Lucy's...is curving like a giant Mona Lisa smile, upside down!  Concerned, I popped the piece over my head and found it is HUGE!

Thinking maybe I had somehow increased my stitches I painstakingly counted each round.  Nope...all the same.  The only explanation that I can come up with is that, using unknown free yarn, I am crocheting together strands of differing weights and fibers...and that is somehow influencing my neck warmer!  Possible?  I honestly don't know.  I can only manage to straighten it out slightly.  


Had this piece all been made from one continuous strand of yarn I would have unraveled it immediately.  But, since every strand is a new color, unraveling now could mean wasting a LOT of yarn.  It doesn't matter that it was FREE yarn.  Yarn is yarn, and I am not about to waste it. 

So I will continue on with my crocheting...wondering all the while WHAT I could have possibly done to cause this variation on the expected.  If it turns out to be way too large and cumbersome to service as a neck warmer, I'm thinking a nice pillow cover or handbag could be made from my work.  Surprisingly, I LOVE the color variations and am absolutely THRILLED with how the piece is turning out....even if it could, with no stretch of the imagination, become a neck warmer for a Sumo wrestler!

Sunday, April 28, 2013

REDUCING MY CARBON FOOTPRINT...

Eco Concept - Earth In Hands  Stock Photo

I'm a tree hugger, always have been and probably always will be.  Over the years, though, I have not truly considered the impact that my actions have had on our earth.  My excuses have been laziness and lack of time and inspiration to take the steps necessary to lessen my carbon footprint.  In my defense, I did immediately sign onto the waiting list for a Prius when they were first introduced.   (I absolutely LOVE the Prius and our 46 MPG is a help to our pocketbook and our environment!).  Commendable, but certainly not enough of an effort!

Along those lines, I have been trying to come up with ways of reducing my footprint by reducing my use of disposables.  In a previous post,"Supplies for a Simpler Life" I reviewed many of the handmade items I have begun to use in place of "disposables".  Once again, commendable, but certainly not enough!  I need to continue my effort!


My most recent addition to these items are a supply of handmade hankies. Now that spring is finally here (I hope), my allergies will be kicking in full force.  A few years ago I attempted to use one of my hubby's white cotton hankies instead of purchased box tissues.  Oh, my poor battered nose!  I was RAW within two days!  I don't know how anyone can use those rough things on a sensitive pollen or cold ridden nose!  Discouraged, and SORE, I went back to boxed tissues.  


A few weeks ago I was moving some flannel into my ESR (expanded sewing room).  I had several pieces of thin, really soft flannel given to me by a fellow Freecycler.  Oh...they were just SO nice to rub my hands over.  In fact, they were so soft that I put them up to my face to feel their wonderful nap.  Then it hit me!  Why couldn't I make hankies out of flannel???  

Life was a bit crazy at that point and I didn't have a chance to work on my idea until more recently.  Using my 6.5" square quilting ruler I cut out 22 individual hankies.  They aren't big, but since I only use a hankie once or twice before depositing it in the hamper, I don't need a large square in order to search out unused cloth with each sneeze.  Using the overlock stitch on my "Ellie" I edged them all up and hoped for the best. 

When I did laundry yesterday (I'm changing my laundry day to Saturday) I had 7 handmade hankies to wash.  I threw them in with my load of towels and hung them to dry.  There were no loose threads, no pulling, shrinking or loss of stitching.  Success!  Today I folded them back into small squares and placed them back into the old tissue box that sits on my desk.  My next chore...to find an adorable hankie holder for my desk (lookout thrift store..here I come), or, as a last resort, add a quilted cover to the ugly box!

Saturday, April 20, 2013

THRIFT STORE TREASURE!

Today I went to the thrift store looking for yarn.  Unfortunately, I forgot that yesterday was their 50% off sale day and the place was picked clean.  I have never seen the shelves and walls so empty!  In my mind I was also looking for a small jar, pitcher, etc. that I could use to hold pens and markers on my sewing table. 


I have been housing them in my multi-sectioned container, but I really need the space for sewing gadgets, not pens. 

Imagine my surprise when, on those terribly empty shelves, I spotted the perfect solution to my pen storage needs...and it wouldn't take up any extra workspace...which is at a PREMIUM, lol.


I just LOVE the feminine cottage-y look of my find.  It fits in perfectly with the rest of my sewing room decor...


Friday, April 19, 2013

MOTHER'S DAY CAME EARLY!!!

 Gift Boxes Stock Photo

Yesterday afternoon I opened my front door to find a large box perched up against the siding.  I did a quick mental inventory of the packages I was waiting for...a gift card, some crochet hooks, and a giveaway win of a pin and some fabric...nothing that should be in a box THAT big!  Pulling the box away from the wall, I read the tag.  Hmmmm....it was from Amazon and was addressed to my Dear Hubby.  I searched my memory trying to remember if he had told me to be on the lookout for a delivery...clothing?, shoes?, gadgets?  Nope, nothing I could remember.  Not knowing what was inside I carefully carried the box into the house.

Later in the afternoon, when Hubby called to see how I was feeling, I told him a big box had come from Amazon.  "What did you order?"  "Oh, don't open it!  That's your Mother's Day present!"  Hmmmm....what could I have wanted that would come in a box that size?  Too heavy for clothing, and since I got a Nook my Amazon wish list contained very few hard bound books.  I put it out of my mind since Mother's Day is still a ways away.

When Dear Hubby got home from work last evening night (8:00 PM! Convince your kids they do NOT want to be corporate tax managers!) he asked if I wanted my gift now or later.  Is he kidding?  Given a choice he really thinks I'd wait????  How could I enjoy vacation the first week of May if I was wondering what was in the box the whole time?  And the 10 hour trip home on Saturday...the day before Mother's Day?  Interminable!  I couldn't get the box open fast enough, lol.

Inside...


Intrigued, I opened the cute pink latches and tried to pull the handle apart.  Nothing.  Nada.  No movement.  I reclosed the latches and opened them again.  (Don't ask me WHAT I thought that was going to do, lol!)  Nope.  Didn't budge.  Then I noticed the teeny, tiny zip tie in a hole I assumed was for a tiny lock.  I grabbed the scissors and had at it.  My shaking hands made settling the teeth of the scissors on the zip tie impossible.  I honestly think it was more excitement than my usual tremor, lol.   Fortunately Hubby reached out for the scissors and easily snipped the zip.  

Inside...


TA-DA!!!

Something I have wanted for ages and ages and Dear Hubby has argued, on more than one occasion, that I simply didn't need.  "You don't need your own tools, we have plenty of tools already."  Uhhh...yeah...but try finding one when you need it!  Kinda like MY Dremel whose bits and pieces are spread from one end of the garage to the other, lol. 

So now, FINALLY, I have all the tools I need for anything and everything a crafty lady could want.  And the screwdriver is a cordless battery model for days when I don't have the strength to handle a normal screwdriver!  And the best part yet....it's PINK...meaning there is little to no chance my cutesy pink tools will make their way into either Dear Hubby or J's toolboxes!  

Hmmmmm....I wonder if the Dremel comes in pink.....


Tuesday, April 16, 2013

WORKING ON MY GUEST ROOM QUILT...AND MORE...

Since J moved out of the house back in January, Dear Hubby and I have been playing musical bedrooms...fixing up J's room as my "Expansion Sewing Room" and slowly moving hubby's "house" office out of the fourth bedroom, which will become our new guest room.  Since we have moved J's old queen sized bed into the guest room, we will need bedding to match the room.  Luckily I found a set of new blue sheets in the linen closet, but the only blankets/quilts available to put on the bed are J's old black vellux blanket and his dorm room denim quilt.  Not very pretty for our new room!  Serviceable and warm, yes, but pretty?  No.  So I have begun work on a quilt for the bed.


After paying to have J's old room repainted, hubby and I certainly can't afford to change the decor of the guest room too.  Being "stuck" with the yellow (not my favorite color...the room was originally J's gender neutral nursery updated years ago with a border and curtains to make a grown up bedroom)


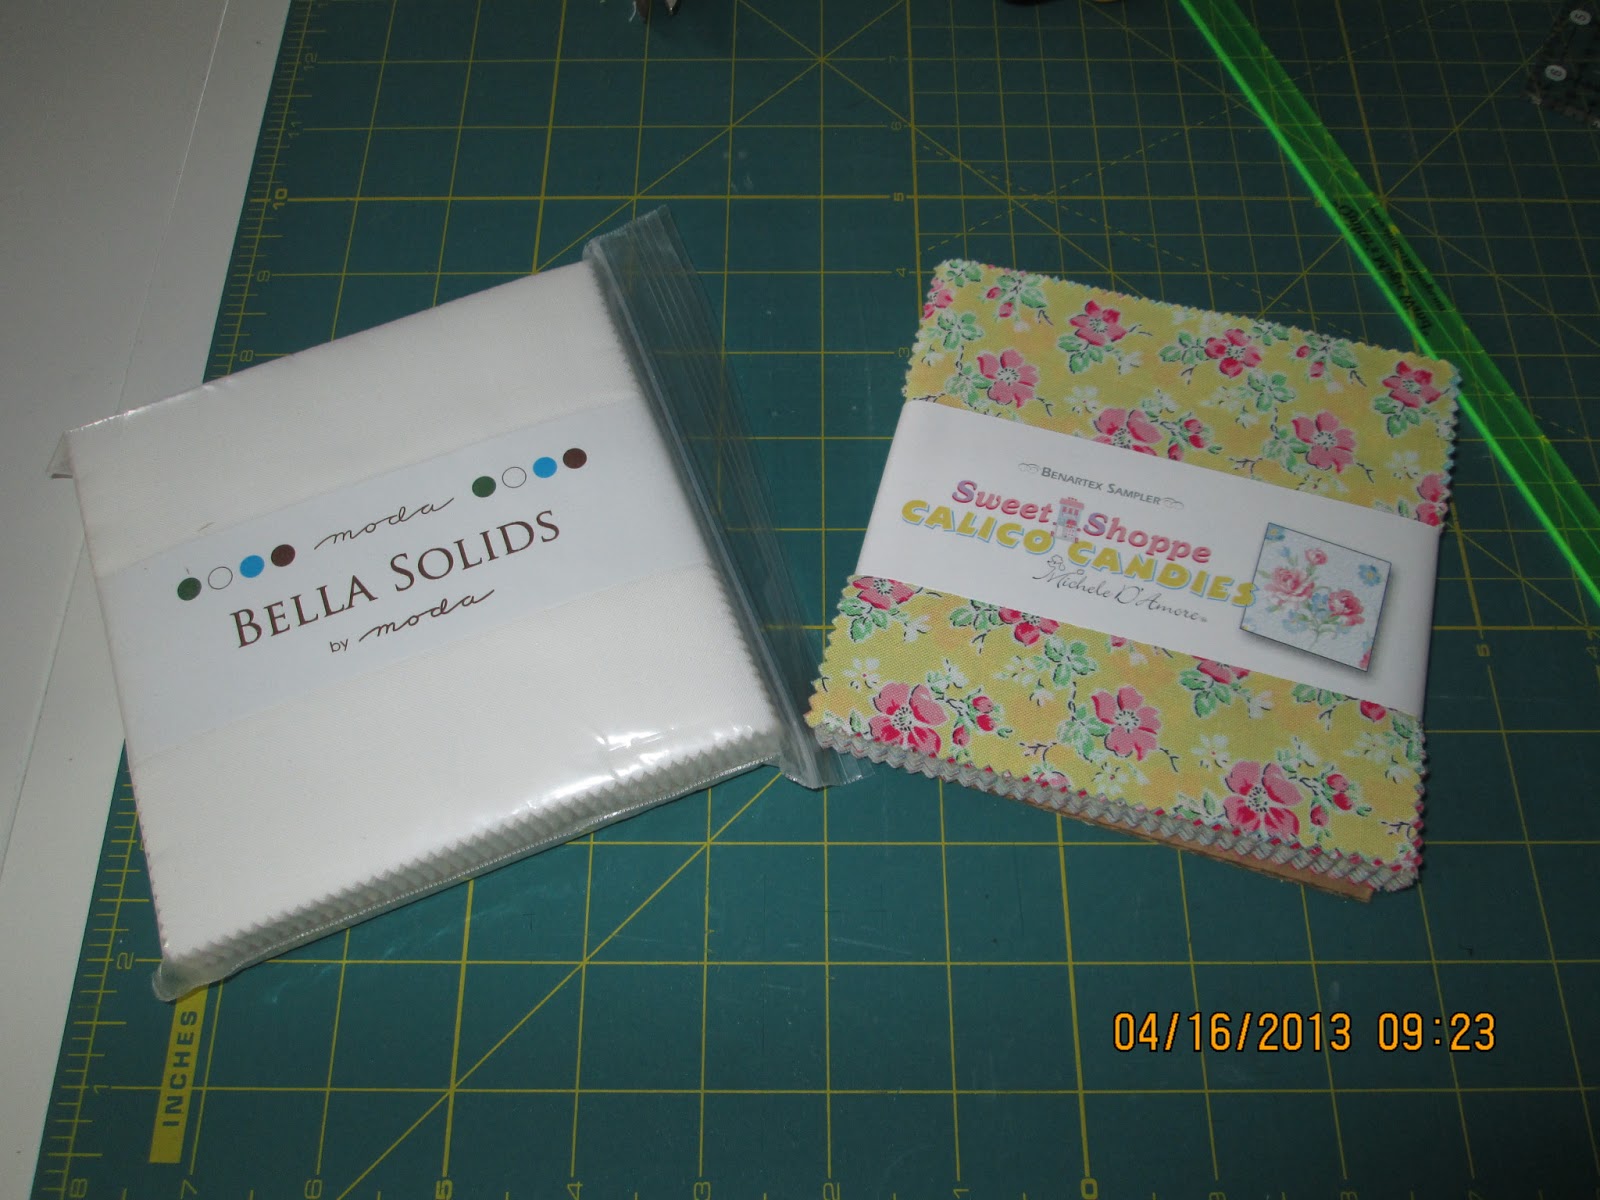
I picked out Sweet Shoppe Calico Candies material by Benartex as it contained all of the colors of the bedroom and retained that "cottage-y" feel (which I DO love, by the way!  It's so ME!).


I then picked out a pattern that felt "scrappy" to me (my first love in quilts) and mimicked the lattice frame on the wall.   However, since I am using 5" charms to construct this quilt, with each of my blocks finishing at 4.5", it is going to require tons and TONS of blocks and hours and Hours and HOURS of work!  Good thing I am in no rush to have the room finished (especially when I only average 12 to 18 blocks per week!), lol.  I am not even sure I have enough charm squares to finish a queen sized top.  Lol.  I tend to "wing it" when designing quilts and adapt as I go along.  While I do have quite a few similar patterned/colored fat quarters that I could cut into charms allowing me to keep it completely a 4.5" block quilt, I may consider some type of sashing to break up the pattern and speed the quilt to completion.  I'm not sure yet and will play it by ear as I move along.  


I am using Bella Solid white charms in the construction of the block.  


Each charm is cut into 2.5" squares, which are used to form the pattern of my quilt blocks.  


White squares are positioned in opposing corners and pinned in place. 


Then, using my all-time favorite quilting gadget (Quilter's Magic Wand), I draw my stitching lines. 


By moving the wand to the right of the stitching line I am able to draw another stitching line 0.5" away.  


Two stitching lines done.  


Flip the block around and do the same on the other 2.5" white square. 


Move to the machine and sew on all four stitching lines.  


Snip all threads and prepare to kill two birds with one stone!  


Cut down the middle of your two sewn lines.  


This will give you your primary block AND two teeny tiny half square triangles for a future project!


I wasn't kidding when I said "teeny, tiny"!  Those small HST's will finish at just 1" square!  Teeny, tiny and Oh. So. Cute!  I am thinking they would look just darling as the border on a throw pillow!  As tiny as they are, though, I know better than to try to work with them unless I am having a really good tremor day, lol.  


So, after working on my quilt for just 30 minutes my tremors decided to make their presence known and forced me on to bigger, more tremor friendly things (crochet).   


My stack of completed blocks to date.  A mere thirty one blocks out of, oh I don't know, maybe a gazillion?  This quilt is going to take a long, LONG time, lol.  I think my mom was right when she said I needed to live to be at least 125 to finish all of the projects in my head, but maybe I need that many years just to complete THIS one!


Off to work on crocheting the last dish cloth so I can list them in my shop.  Oh, and speaking of crochet...


On Sunday the landscaper came out and weeded, edged and mulched my flower beds.  Over the years all of my beautiful daffodils have died...with the exception of the muted, slightly peach colored flowers you see above.  They looked so pretty set against the new dark black mulch.  So I took my scissors out and cut a few fresh flowers to enjoy in my sewing room.  After pulling out my small vase I decided that a thin, top heavy water filled vase was NOT an ideal candidate for a tremor ridden admirer.  I could just PICTURE the vase and water splattered all over!  A quick search through my glass jar collection located this short, squat jelly jar.  While I like the pattern in the glass, it was still BORING.  So I crocheted a white bobble edging to put around the rim.  Okay, better...but still kinda BORING.  I crocheted a few pink flowers and green leaves to add to the edging.  I pinned them onto the edging in an effort to "live with the look" before I attach them permanently.  Cute, but.....I don't know.  


I like the light pink because it clearly picks up the pink flowers on my tea pot, but I feel like something is just not "right".  Maybe two flowers are too much?  Any suggestions are welcomed!!!! 
 

Sunday, April 14, 2013

SIMPLE SEW-SEW SUNDAY

Ahhh....Sunday.

Since it is officially the start of a new week, I try to spend Sundays accomplishing some necessary chores (clean underware IS a necessity, lol) and a bit of relaxing... crafting, reading and/or crocheting.  It is my hope that by beginning my week in a simple, slow, SANE manner the rest of the week will follow suit.  Does it work?  Usually...no, lol.  But that doesn't mean I can't hope for less craziness in my life, and certainly spending the day in peace and contentment can't hurt! 

I awoke at 7:00 AM, threw on my robe and headed into my sewing room.  I started my computer and then mosied downstairs to the kitchen for my breakfast and a steaming mug of rich black coffee.  YUM.  In the intervening two hours I have finished one load of laundry (I will fold it later today during another chunk of activity), have the second load of laundry washing and the third load is sorted and waiting its turn.


After checking my emails I turned on my sewing machine, opened my windows to the beautiful spring morning and started my MP3 playing Celtic Thunder, Enter the Haggis and a Tchaikovsky Nature CD.  Quite a variation in music genres, but a perfect foil to my sew-sew Sunday...Celtic Thunder and ETH to spur on my sewing mojo and Tchaikovsky to soothe me as I periodically rest in my rocker, reading.  Yes, I have a thing for alliteration this morning!


I sewed up about a half dozen 5" blocks for my guest room quilt (which, by the way, is going to take FOREVER) before moving to the computer side of the room to begin this post.  Activities in tiny bites with chunks of resting interspersed along the way usually make for more accomplishment overall.  In a few moments I will save this post to continue later and will move to my rocker to read.  I've downloaded 50 Shades of Grey from the free library.  I haven't gotten very far yet, and while I could do with a little less "explicit details", I am anxious to read forward and see how the "romance" plays out.  Why do writers assume that "explicit" is necessary to "grab" the audience?...no pun intended.  I'm really not a prude, but GEEZ.


After a pretty long resting period I have pulled out the sock loom that DS bought me for my birthday back in August.  I wanted to try something "different".


I watched the video a few times, looked up some other information on the website and have "cast on" and am knitting the first row of my very first sock!  It is SO simple.  I don't think I will be able to do it on a really bad "tremor" day, but I'm sure I will find some times when I am capable of the task. I think the loom will be packed in my crochet bag for the trip to Myrtle! I worked on the sock loom for a brief period before I ripped out the first few rows I had done.


I am using yarn that was given to me on Freecycle and I'm not sure it is actually the type of yarn that should be used with the loom.  I think I will buy actual SOCK yarn for my first real attempt.  What I was using is separating way too easily.


Since I was giving up on the socks I decided to sit in my rocker and do a few rows on my cotton dishcloths.  I LOVE this pattern.  It is SO easy to do and I love the effect!


See my cute little mug rug?  This was my very first attempt at free motion quilting.  I didn't attempt to follow any particular pattern, just did a rather wonky spiral on the brick side and some small loops on the floral side.  The quilting is actually pretty pathetic, but I was not about to waste material!  So I added a bit of ric-rac and some premade binding and turned it into a mug rug for next to my rocking chair.

After dinner I signed the contract for our new roof and Dear Hubby wrote out the check for one third down.  All I have to do is mail it and our job will be on the books for sometime after May 21st.  We have picked out the shingles...Granite Gray.  The contractor said he will call me a few days after he receives our paperwork to discuss colors.

Then I placed a rather large order for our prescription medications for the next three months.  I am SO thankful that we have good health insurance with prescription coverage!

I have spent the past half hour browsing on Pinterest, looking for crocheted afghan patterns that I can try while we are on vacation.  I intend to take enough yarn to make socks with my loom, crochet a pair of slippers for my Dear Hubby and assorted acrylic colors to make an afghan for the guest room.  Of course, NONE of these will get finished in our one week of vacation (well MAYBE the slippers will be completed), but at least I will have variety!  Between reading, crocheting and watching the ocean I have more than enough relaxing activities...no matter what my body decides to do while we are away! 

Tuesday, April 9, 2013

JUST A LITTLE SOMETHING...

On Friday I picked up a copy of Mollie Makes that contained a kit for making a small change purse.  My handbag is already way too heavy to add a stash of coins to the contents.  So I decided to make the coin purse and use it to store empty bobbins at my sewing table.  I tend to buy bobbins in quantities of 25 to 35 as I like to have a bobbin filled and waiting when I am ready to sew.


This morning I took out the kit, found the instructions near the back of the magazine and set about making my oilcloth coin purse.  The kit came with everything needed to make the purse, excepting glue and needle and thread.  I imagine it could be hand sewn, but for me that is not an option.  My machine worked beautifully and I was amazed at how easy it was to sew the oilcloth!


I found the purse quite easy to make and it was done in no time flat!  My only difficulty was the "strong adhesive" needed to glue the pouch into the hinge mechanism.  Oh my goodness!  The instructions said that this step was a bit "fiddly", which honestly it was pretty easy...except for the glue that covered me, the scratch pad I was working on top of, and the coin purse!  The last time I used this particular adhesive I SWORE that the next time I would use latex gloves.  Did I remember?  Of course not!  That is, not until I was picking dried glue off of the purse, my hands and my clothing! 


Anyway, I am happy to say that my new "bobbin keeper" is completed, filled and sitting on my sewing table waiting for my next bobbin winding.  Yup, it is adorable and well worth the glue mess...even if I am picking off glue for the next week or two, lol. 

Sunday, April 7, 2013

A WONDERFUL LADIES DAY OUT!!!


4-H Center - front Learning Gardens

Yesterday my mom, dear aunt and I went to the quilt show at the local 4H club.  Oh WOW...it was a WONDERFUL day out.  We saw so many beautiful quilts and had a fabulous day of just three women enjoying each other's company.  It was a bit tough on us physically, but we took some sitting breaks to regain our strength and balance throughout the day, lol.  They even had a cafe that served hot dogs and hoagies, sodas and all kinds of home baked goods.  A yummy way to rest our bodies!


Upon entering we were each given a small token gift.  I didn't open them until this evening and realized that they were not just small squares of fabric (as I had thought), but teeny tiny hexie papers too (maybe 1/2 inch size), enough of each to make a "flower".  Of course mom and my aunt gave me theirs! I know I can't sew them by hand, but I'm hoping maybe to get a bit of help making the hexies and then I can sew the flower by machine.

I then stopped at a table to sign up to be contacted by our local quilting guild...Homemaker's Country Quilters.  I would really love to be involved with a guild.  I may not be able to make every meeting, but I sure would love to try!  


We were also given door prize tickets.  Mom and I weren't lucky, but my aunt won!  She received a bag that contained a large piece of Michael Miller Tipsy Square fabric, a key fob and a book, What I Learned From God While Quilting.  Of course, she gave her door prize to me!


Since my hubby is very patriotic, my dear aunt bought me a kit to make a "flag" wall hanging.  It isn't an exact depiction of the flag, but an "artistic" rendition.  I can't wait to make it!

And now for the things I just couldn't help purchasing!!!!!


As I said, I did purchase some things...but they were WELL worth the cost.  First up, a bag of scraps purchased from a quilt shop that is not too far away; and I never knew they existed!


Inside the "main" sales room I found a few big boxes FILLED with trims at incredible prices.  Each of these little bags of ribbon cost $.25!  Now that I have an assortment of ribbons, I really do need to come up with a "standardized" method of storing them all!


Next I purchased a bag of 7.25" x 3.25" strips for $15.  I can see a LOT of pieced goodness in my future!  I haven't had the chance to look through the stacks with more than a quick fanning of the strips.  I can't wait to take them apart, piece by piece and separate them into color categories for storage!

LAST BUT NOT LEAST.....
Patterns!  They had the largest selection of patterns I have ever seen...ANYWHERE...and they were all dirt cheap, ranging from $.50 to $1.50.  What a savings! 

My favorite in this grouping is the Christmas quilt on bottom right. 
My favorite in this grouping is the party bags.  I think I will make them in colors to match my sewing room and store my small rulers in the bags!
My favorite in this grouping is the teapot table runner. 

OH MY GOODNESS....THE QUILTS!!!!!!!!!!

And, last but not least...I will leave you with some samples of the gorgeous quilts they had on display.  Oh to someday be that good!

The flags were actually real little flags slipped into a pocket!
These aprons were adorable!  I have come to the conclusion that I really like 3-D quilts...probably why I am so inclined to use buttons on my quilts!
This is my favorite little quilt!  I just love COTTAGES!


Oh, by the way, my Stitcher's Pocket Pouch was a hit!  I was stopped by several people and asked if I made it.  They loved the idea to empty my hands for examining quilts, etc. (with gloves of course) but REALLY loved it when I explained that I originally designed it to keep track of my notions while sewing!  I may have to see if I can take this idea further!